Configuring Mobile Layouts
•Creating a Mobile Layout List View
•Adding a Mobile Layout Form View
•Pushing Server Updates to Mobile Views
•Handling Business Rules on the Mobile Client
About Mobile Layouts
Service Manager is supported on the Apple iPhone and iPad, enabling users such as service technicians and Change Managers to perform tasks in the application while away from their desks.
The Service Manager mobile application employs three primary components:
•A menu of business object views to work with, called mobile user interfaces.
•A list view of items of that business object type that the mobile user can act upon. This is displayed when a menu item is selected.
•A form view that the user can view or edit, displayed upon selecting a list view.
A mobile UI layout is composed of two UI elements, a list and a form.
•List View: The list view is also known as the list view, and it determines how a list of records is displayed on your mobile devices.
•Form View: The form view determines how the details of the form display.
The following procedures are for configuring user access through the Apple app.
Viewing Mobile Views
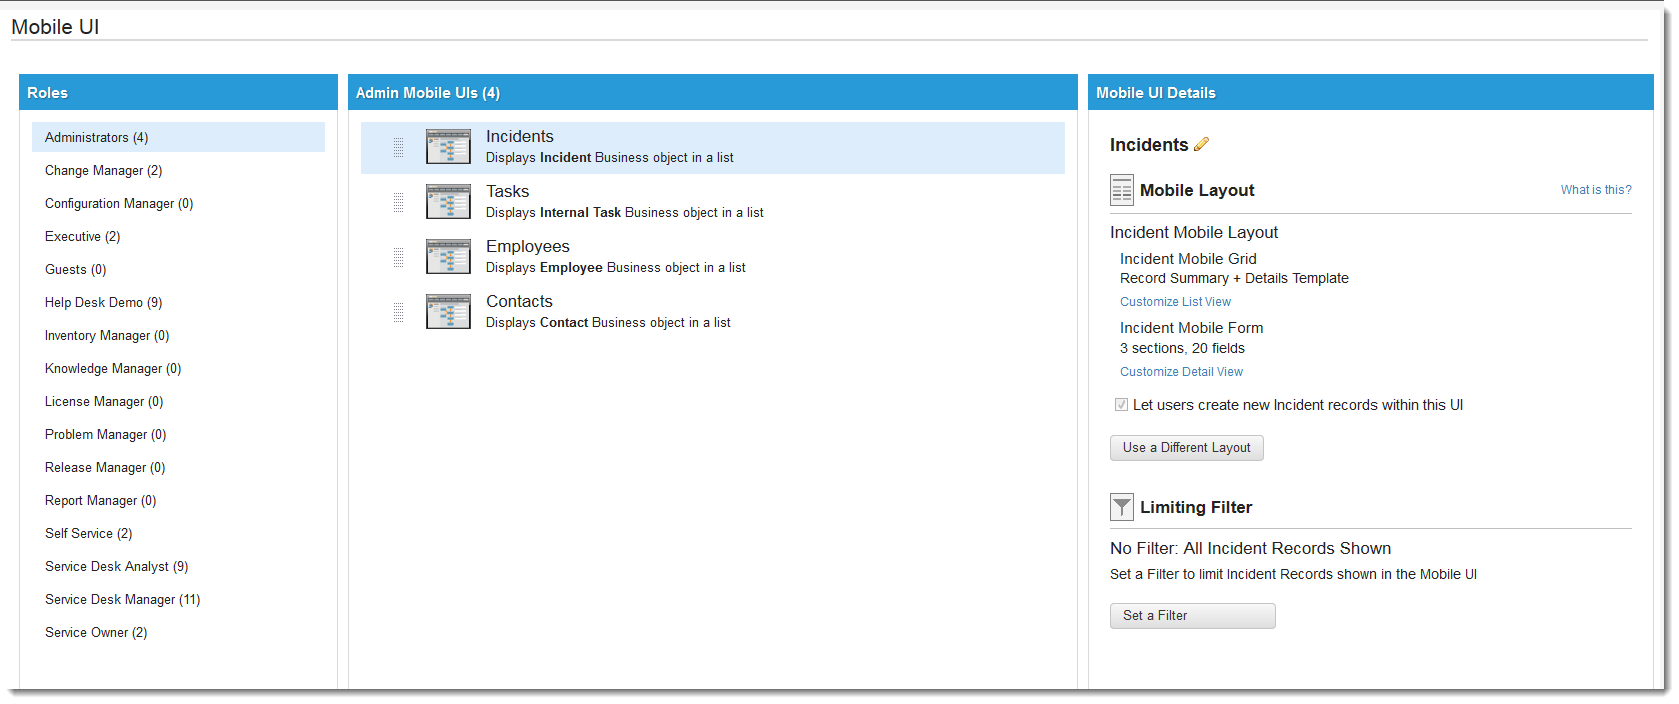
1.From the Configuration Console, click Build > Mobile Settings to display the Mobile Layouts workspace.
The workspace lists the roles, the user interfaces for each role, and any filters.
Mobile Layouts Workspace
Creating a Mobile View
1.From the Configuration Console, click Build > Mobile Settings to display the Mobile Layouts workspace.
2.From the Roles column, select the role for which you are creating the mobile view.
3.Click Add Mobile Layout. The Mobile Layout Wizard appears.
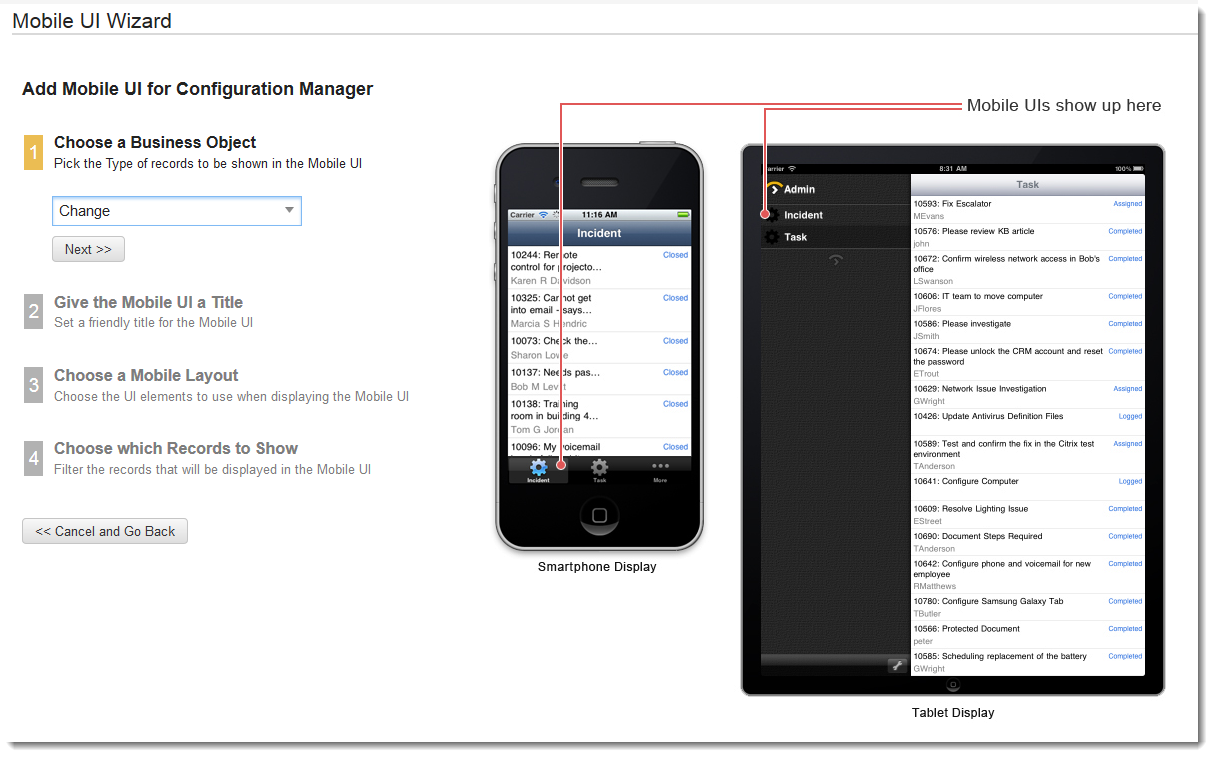
4.From the Choose a Business Object drop-down list, select a valid business object to associate with this mobile interface.
Choose a Business Object
5. Click Next.
6.Enter a descriptive display name in the Give the Mobile Layout a Title field.
7.Click Next.
8.From the Choose a Mobile Layout section, select an existing mobile layout to associate with this user interface, or click Create a New Layout.
9.If creating a new layout, enter the layout name.
10.Click Next.
11.From the Choose which Records to Show drop-down list, select the records to show from the selected business object.
If needed, use the drop-down list in the Default Filter field to select a filter to apply to items in the user interface on the mobile device. For example, you can select a filter to display only open incident records or unassigned tasks for your team.
12.Click Finish & Add Mobile Layout.
The mobile layout that you created appears in the Admin Mobile Layouts list. Select the layout from the list to create the layout, described below.
Creating a Mobile Layout List View
After you create a new mobile layout, you can add a list view to show a list of records on mobile devices. Changes to the view appear on the mobile device when the page is refreshed.
1.From the Configuration Console, click Build > Mobile Settings to display the Mobile Layouts workspace.
2.Select the role and business object for which to add a new list view.
3.From the right pane, titled Mobile Layout Details, click Customize List View. The New List editor appears.
New List Editor
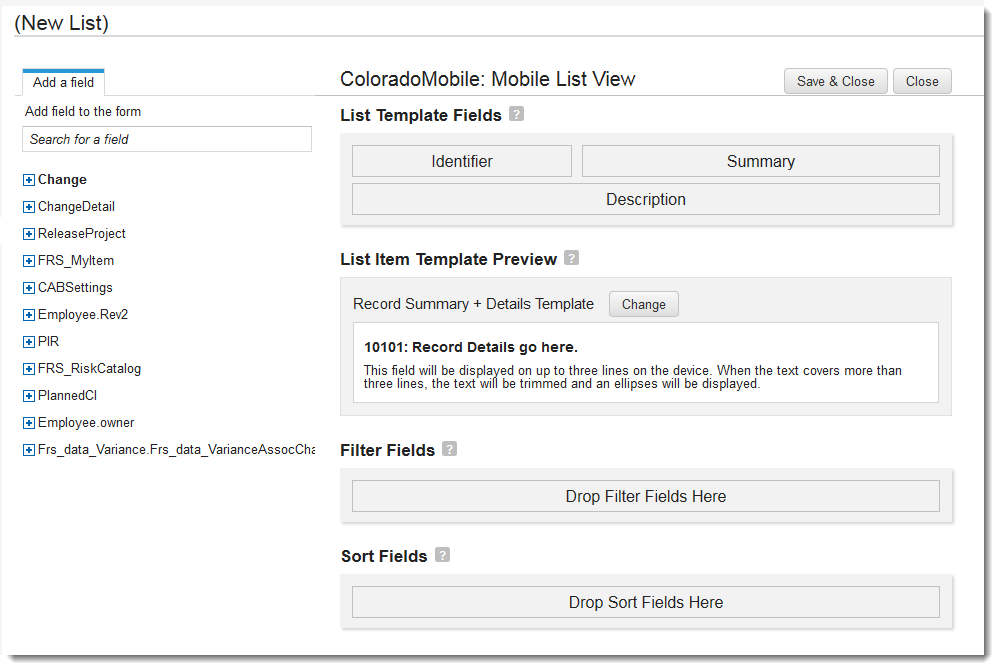
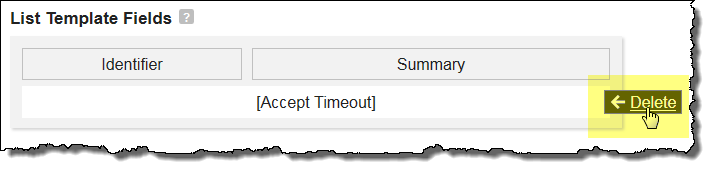
4.Drag and drop identifying fields from the folders in the Add a Field tab to the List Template Fields area. You can remove a field by hovering over it to show Delete, then click.
List Template Fields
In the List Item Template Preview section, the default Record Summary + Details Template section shows record details. The template is constructed to use multiple fields separated by a comma.
5.To change the template, do the following:
| a. | Click Change. The Select List Template window appears. |
| b. | Select an option: |
| Option | Description |
|---|---|
| Record Details go here | Shows up to three lines on the device. When the text covers more than three lines, the text is trimmed and an ellipses (...) appears. |
| Comment Template | Shows and adds comments. The user name appears with the comment. |
| Status + Owner Template | Shows the record status owner, the record owner name, and current status information, including due date and time.) |
| c. | Click Save. |
6.In the Filter Fields section, create custom filters for this view by dragging one or more fields into the Drop Filter Fields Here section.
•You can modify the default filter later.
•You can set up additional filters. For example, in the Limiting Filter section, you can filter by all open incidents, but here you can filter all open incidents by status and location. The fields that you select here are the ones that will appear in the list view.
•You can reorder the components within this section by dragging and dropping.
7.In the Sort Fields section, specify the sort order for the list.
•Click Default next to the sort field that is the default list view. For example, you could use the CreatedDateTime field as the default sort order.
•For each sort field, view if the sort order should be the default ascending or descending. By default, the sort direction is ascending. To change the default sort order for the view, click Ascending to toggle to descending.
8.Click Save & Close at the top to save the list view.
Adding a Mobile Layout Form View
After you create a new mobile layout, add a form view.
1.From the Configuration Console, click Build > Mobile Settings to display the Mobile Layouts workspace.
2.Select the role and business object for which to add a new list view.
3.From the right pane, click Customize Detail View. The Form View page appears.
Form View Page
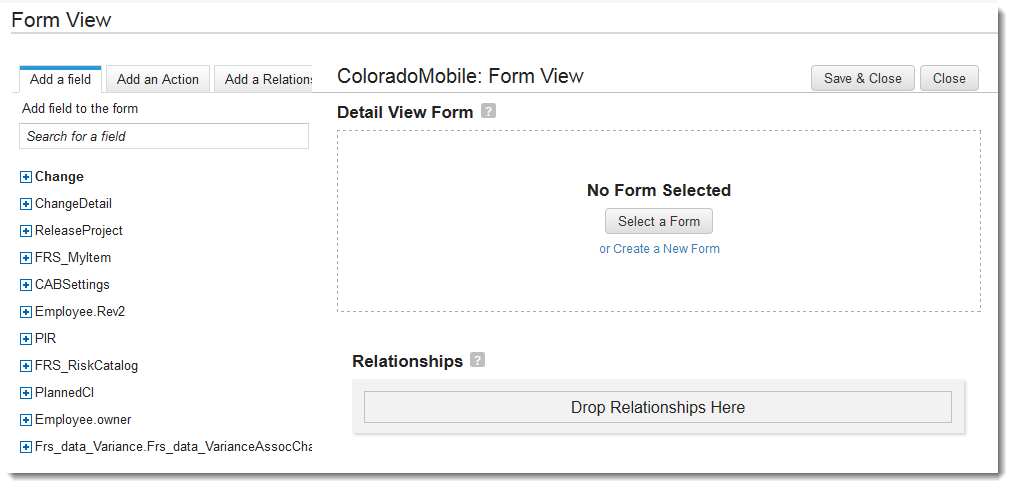
4.Click Select a Form. The form appears.
5.Enter a name for the form in the field that appears and click Save. The Detail Form View page appears.
6.Drag and drop identifying fields from the folders in the left column to the sections in the main area.
For example, you could drag the IncidentID field into the Identifier slot on the default incident form, and Summary into the Title slot.
7.You can remove a field by hovering over it to show Delete, then click.
Detail Form View Page
8.In the Form Fields section, drag and drop fields from the Add a field tab to add them to the form.
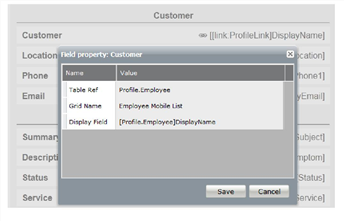
9.When you add a link field, ensure that a mobile layout is defined for the object. For example, add the Profile.Employee link to the Employee Mobile List list.
Employee Mobile List
10.Search for a field by entering the field name in the Add field to the form field.
11.Click Add a Section to add a new section to the bottom of the form. To remove a section, hover over the section to show Delete, then click.
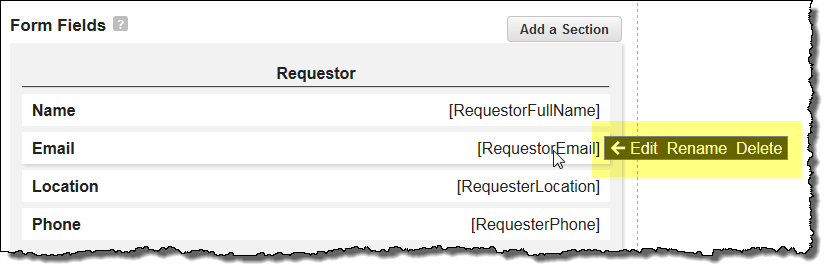
12.You can edit field properties from the Edit, Rename, Delete pop-up link.
Edit Field Properties
13.In the Actions section, click the Add an Action tab to add associated quick actions to the mobile form view.
14.Drag and drop existing quick actions for the business object.
15.In the Relationships section, click the Add a Relationship tab to add associated relationships to this section.
16.Drag and drop existing relationships for the business object.
For example, attachments, notes and task assignments associated with the incident business object are displayed by default when creating an incident form for a mobile user interface. You might want to associate configuration items with the incident record. If so, for example, you drag and drop the relationship object called CI (IncidentAssociatesCI) into the Relationships section.
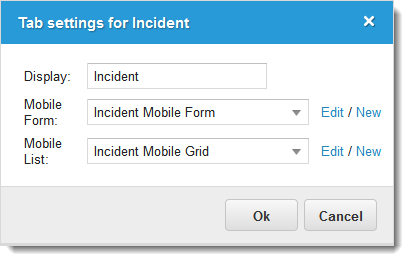
The tab settings for the <relationship name> window appear when you drag and drop a relationship object. Select a mobile form and mobile list for the object. If the menu is empty, you need to create a new layout for this object. Click New to create a new layout or click Edit to edit an existing layout, if one exists.
Tab Settings
17.To allow users to create new relationship records, select Allow users to create new records in this UI next to the applicable relationship object.
Allow Users to Create New Records

18.After you place a relationship field, you can click Delete for any field or control to remove it from the display.
19.You can re-order the components within each section by dragging and dropping.
20.Click Save and Close at the top to save the form view.
Setting Up a Filter
When you set up a filter, you are using one of the saved searches set up for the business object, which specifies which records should appear in the list view.
1.From the Configuration Console, click Build > Mobile Settings to display the Mobile Layouts workspace.
2.Select the role and business object for which to set up a filter.
3.Under Limiting Filter in the right pane, click Set a Filter. If there are no saved searches for the object, then no filters appear.
4.Select from the saved searches that appear, then click Save.
For example, for an incident business object, if you select All Active Incidents, then only the incidents with an active status appear.
The chosen filter name appears on the Mobile Layout page.
Pushing Server Updates to Mobile Views
Server-side business rules are executed. After being successfully saved, the fully-processed object is returned to the client. The client accepts the object with the updated values and reloads the current object. You will see these changes immediately, without having to refresh the user interface manually.
•An error message appears on the mobile interface when the server save operation fails.
•If the object was changed outside of the mobile application (by other users or from web client), there can be a delay.
•Records are subject to "cool down time": records for the user interface are considered to be current for a certain period since the last update (default time is 1 minute). If the elapsed time since last update is more then the cool down interval, records are re-retrieved from the server when you open a user interface.
Handling Business Rules on the Mobile Client
When you edit form fields, the following business rules are evaluated on the mobile application:
•Read-only rules: conditional restrictions applied to some fields.
•Required rules
•Control visibility rules: controls hidden due to current business object state.
Editing mobile forms is controlled by security. If you have the required permissions to edit an incident, you can edit it on a mobile device as well. An Edit button is available at the top right hand corner.
All other rules, such as editing and calculation rules, run on the server.